Do you collect tracking numbers for the orders in your store? If so, can your customers track their shipments directly on your website? At the very least, are you sending tracking numbers to them by email?
As a dropshipper, these features are essential for building trust and improving customer satisfaction.
In this article, you’ll learn how to set up order tracking in your WooCommerce store using our order tracking addon.
Quick note:
If you’re a dropshipper using AliNext, you already know it automatically collects tracking numbers from AliExpress. In this post, we’ll go beyond the basics and show you advanced order tracking techniques to enhance your WooCommerce store.
Let’s get started:
- Order Tracking Features
- Setting Up the Order Tracking Addon
- How to Use the Tracking List Page
- How to Manually Synchronize Specific Tracking Codes
- Using the Shortcode to Track Orders on the Frontend
- How to Customize Email and Other Templates with Tracking Information?
- Best practices for using the tracking plugin
Order Tracking Features
In this video, we’ll cover:
- The built‑in tracking features available in AliNext, our plugin designed for dropshippers
- Advanced tracking options you can unlock by installing the order tracking addon
What Features Come with the Tracking Addon?
Core Features
- Display tracking numbers in customer email notifications
- Show tracking details in customer accounts and on the order page for the site administrator
- Integrate seamlessly with popular tracking services: 17Track, Cainiao, AfterShip
- Add a tracking form to your website using a shortcode
- Customize tracking templates for emails, customer accounts, and the admin panel
- Introduce a new “Shipped” order status in WooCommerce, complete with its own email notification and template (fully overrideable in your theme)
Advanced Features (require AfterShip API Key):
- Daily automatic synchronization of tracking information
- Automatic carrier code detection based on tracking number
- Automatic status updates in WooCommerce when tracking numbers reach the Delivered state
- Manual synchronization for specific tracking numbers
- Group tracking numbers by status: Pending, Shipped, Delivered, etc.
Setting Up the Order Tracking Addon
You can configure all tracking options in WooCommerce > Settings > AliExpress Tracking.
Let’s go through each parameter step by step:
1. Tracking Service
- Available options: None, 17Track, Cainiao, AfterShip
- If enabled, tracking numbers become clickable links. Customers are redirected to the chosen tracking service’s website when they click a tracking number.
- If you prefer to keep users on your site, use the plugin’s special shortcode to display your own tracking form.
2. Add “Shipped” Order Status
- By default, WooCommerce includes statuses such as Pending Payment, Processing, Completed, etc.
- Many stores need an additional “Shippe“” status.
- Enabling this option adds the “Shipped” status and generates a dedicated email notification for customers.
You can customize the email template by creating and editing this file in your theme: [your-theme]/woocommerce/emails/admin-new-order.php
3. AfterShip API Key
- Some advanced features require an AfterShip API Key.
- Follow the provided instructions to obtain and add your key.
4. Enable Tracking Code Synchronization
Activates automatic status updates for tracking codes via AfterShip.
5. Courier List for Auto‑Detection
- When adding a new tracking code, the plugin can automatically detect the carrier based on the code format.
- In AfterShip, detection relies on a predefined list of carriers (e.g., dhl, ups, fedex, hong-kong-post).
- To find carrier codes and view the full list of supported couriers, check AfterShip’s documentation page.
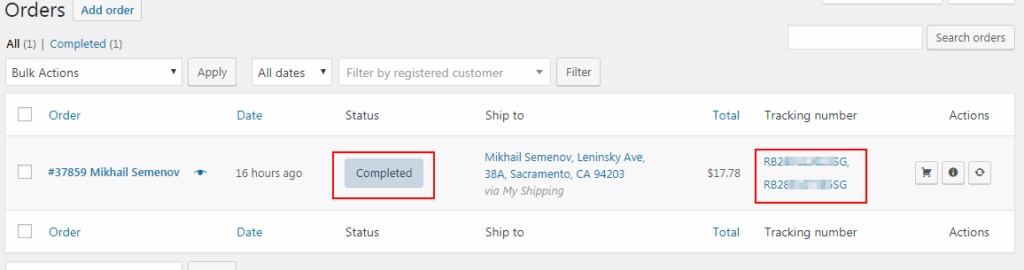
6. Delivered Status Logic
- WooCommerce orders may contain multiple tracking numbers (one per item).
- Often, you’ll want the order status to change to “Completed” once all tracking numbers are marked as Delivered.
Example:
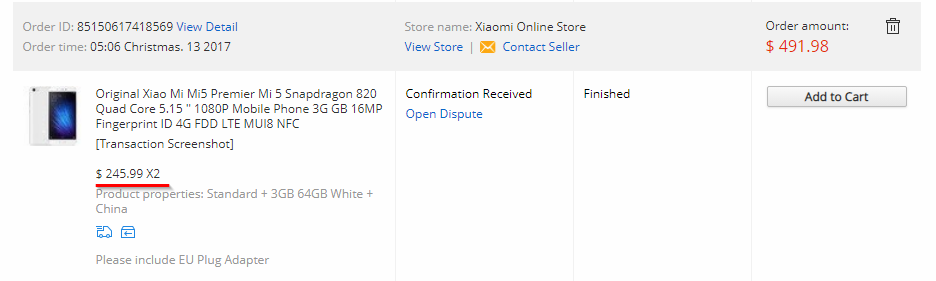
- An AliExpress order contains two Xiaomi phones.
- Each phone has its own tracking number.
- When both numbers reach “Delivered,” the AfterShip API notifies the plugin.
- The WooCommerce order is then automatically updated to Completed.
How to Use the Tracking List Page
All tracking numbers added to WooCommerce orders are displayed on the WooCommerce > Tracking List page.
For convenience, tracking numbers are grouped into categories based on their status:
Plugin‑specific statuses:
- Publish – a new tracking number that has not yet been synchronized
- Error – a tracking number with a synchronization issue
AfterShip statuses:
- Pending
- Delivered
- Expired
- In Transit
- Out for Delivery
- Info Received
- Failed Attempt
- Exception
The first two statuses (Publish and Error) are created by the plugin itself, while the others are assigned by AfterShip.
For detailed explanations of AfterShip statuses, refer to the official AfterShip documentation.
How to Manually Synchronize Specific Tracking Codes
Sometimes you may want to run synchronization manually instead of waiting for automatic updates.
- Mark the tracking numbers you want to update.
- Select the Tracking Sync function.
- The synchronization will run immediately.
Note: In some cases, AfterShip may not be able to automatically detect the carrier code for certain tracking numbers.
- When this happens, open the tracking entry in Edit mode.
- Set the courier code manually to ensure proper synchronization.
Using the Shortcode to Track Orders on the Frontend
The plugin provides a special shortcode: [wcae-track].
Simply add this shortcode to any page or post on your site.
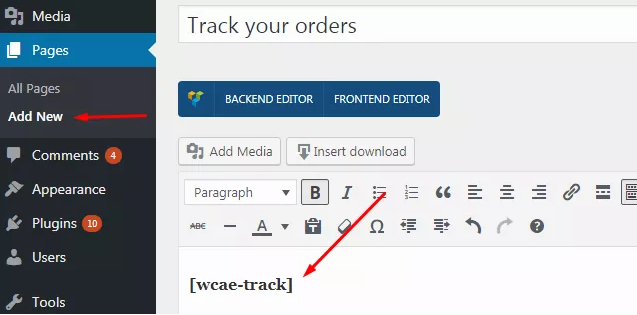
Once added, the 17Track service form will appear on that page, allowing your visitors to check their tracking numbers directly.
Example:
Note: This form is embedded via an iframe, so its design cannot be modified. However, you can customize the appearance of the button and search field by editing the appropriate template in your theme.
Linking the Shortcode Page to the Tracking Service
When you add the shortcode to a page, that page becomes available for selection in the Tracking Service field.
For instance, in the screenshot below, the shortcode has been placed on two different pages. You can choose either one as the designated tracking page.
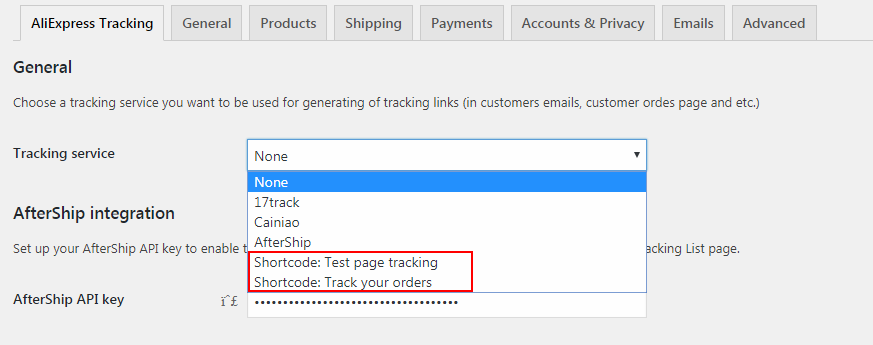
Once selected, all tracking numbers (in email notifications, order details, customer accounts, etc.) will redirect users to the tracking form located on the chosen page.
How to Customize Email and Other Templates with Tracking Information
Tracking details are displayed through templates. Each area — email notifications, user accounts, and shortcode output — has its own template that can be customized.

Locating Templates
To view template names and their structure, check the addon’s templates folder.
Important: Do not edit these files directly. Instead, override them by copying the appropriate template into your active theme folder.
Example: To edit the tracking information template, create and modify: [your-theme]/wcae-shipment-tracking/email/tracking-info.php
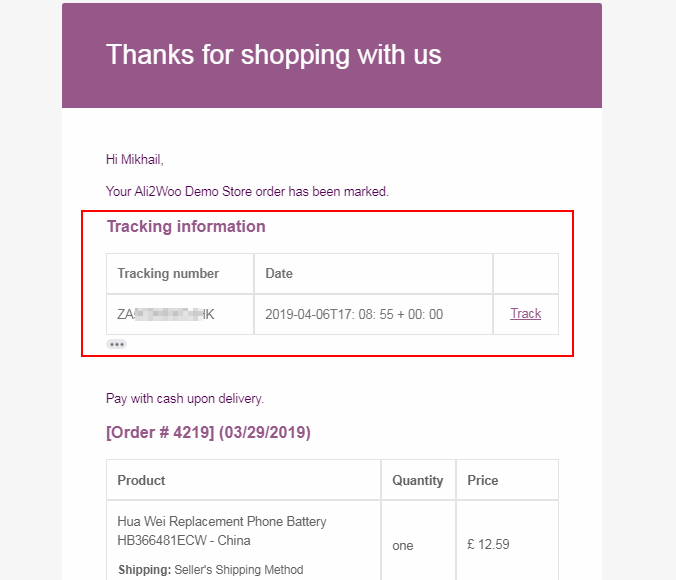
Editing Email Notifications
The highlighted red area in the screenshot shows the section of the email template that can be customized by editing the tracking template.
If you want to modify the entire notification template, you’ll need to override the corresponding WooCommerce email template.
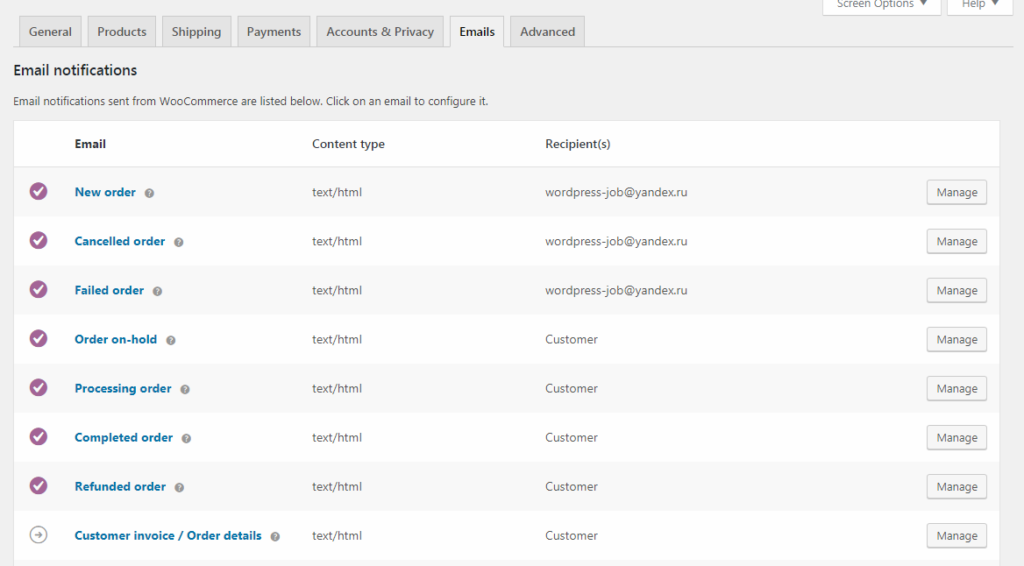
WooCommerce provides several notification templates depending on the order status.
- You can find all available templates under: WooCommerce > Settings > Emails
- Here, you can also choose which notifications WooCommerce sends automatically.
Customizing the “Shipped” Status Template
If you’ve added the Shipped order status (as described earlier in this guide), its template is located at: [your-theme]/woocommerce/emails/admin-new-order.php
Best Practices for Using the Tracking Plugin
After publishing this article, we noticed that some dropshippers still had questions about configuring the addon and using certain features.
In this section, we’ll address those questions and share recommended best practices for working with the tracking addon.
1. Open AliNext settings and locate the Tracking Code Order Status option.
2. When tracking codes are imported, AliNext automatically updates the order status to the value set in this option.
3. Create a dedicated order status for this purpose — for example, Shipped. You can enable the “Shipped” status in the tracking addon settings.
4. Once enabled, every time an order receives tracking codes, its status changes to Shipped automatically, and a notification email is sent to the customer.
Tip: If you’d like assistance setting up this behavior, our support team can help.
Comments open